Archive for the ‘Data Recovery Advice’ Category
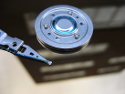
How to fix Device not recognized on USB flash drives and encrypted USB drives
 First, let it be said this is general advice if you can’t read a usb drive and you understand tampering with the device could lose all the data contained in the device.
I had a recovery job come in for a hardware encrypted USB key, when plugged into any USB port:
Device Not Recognized was the message.
This customer had flown to Grand Cayman and his encrypted data drive would not identify to let him get to his data.
In some cases salty air can corrode the contacts on USB devices, or pocket lint/trash can obscure the proper contact points on a flash drive from being readable.
You can take a standard Q-tip and crimp it down, pull off some of the cotton and push the stick back and forth to clean the USB contact points.
To do this the q-tip must be fairly tight fitting between the metal frame and the circuitboard on the end of the memory stick.
This quick cleaning kept him from having to have actual data recovery done on his device.
We then set him up a second device with truecrypt encryption and transferred all his documents onto that device in case the device in question failed.
How to check the smart status of a drive you believe is failing using ubuntu linux.
To make a ubuntu cd-rom, go to www.ubuntu.com get the LTS 10.10.10 i386 version and burn a cd-rom from the downloaded ISO file.
Alternatively, go to Pendrivelinux.com and download the pendrive utility and make a ubuntu 10.10.10 bootable 1gb thumb drive to boot from.
boot from either, click try ubuntu
click system, administration, disk utility
click on the drive you are worried about and open it full screen and look at the smart status, or click on smart data to see the details.
Update of death – Vista… !!0xc01a001d!! 37398/94614 (\Registry\Machine\Components\deriveddat…)
Had a customer today with the update of death for Vista. I searched thousands of articles about this without finding a suitable solution, I thought I’d put this in my blog.
Computer boots up and freezes, upon running start up repair I get:
!!0xc01a001d!! 37398/94614 (\Registry\Machine\Components\deriveddat…)
and the computer locks up.
Computer won’t boot, even in safe mode.
My research shows that the error is due to a log file jamming up. This is caused by something in the update process not going right.
I think it’s funny that if windows can’t complain to the log, it can’t continue to fix any problems.
So, to fix this problem here were my steps:
I booted a linux cd (Click to download Knoppix or Click to download Ubuntu)
The c: drive had 2 partitions /dev/hda1 an/dev/hda2
- I right clicked, mounted the hda2 partion on the desktop.
- Right clicked the hda2 changed it to write mode (If you generate an error saying windows did not shutdown cleanly: sudo ntfsfix /dev/hda2 then repeat steps 1 and 2.)
- I double clicked on the hda2 icon (or open nautulus /mnt/hda2)
- browse to the WINDOWS folder.
- Right click and rename the SoftwareDistribution folder (or alternatively copy it somewhere and delete it)
- Browse to the system32 folder
- Right click and rename catroot2 to catroot2.old
- Click the start gear and click logoff, shutdown
- Pull the Knoppix cd-rom from the drive.
- Boot from the hard disk and select startup repair.
This should get you to the point where windows Vista will run a repair and complete and reboot.
I would recommend you backup your data to an external hard disk and then reformat the computer and setup from scratch as we are not certain what went wrong and don’t want to have to do this again in the future.
How to Handle Boot Sector Corruption using windows.
 Question:
I just ghosted my vista laptop 120 Gigabyte hard disk over to a brand new 640 Gigabyte SATA drive and the laptop just reboots and never shows the vista boot screeen?
Answer:
If you boot the vista boot disk up and fix the boot with advanced options, I it will repair the boot sector and allow Vista to load. Alternatively, you can boot the windows XP cd to command prompt only and run fixboot.
Running fixboot from a windows XP cd will also wipe any boot virus out, if you ever get one that erases your boot sector, or just infects it.
How do I recover from a home NAS (Network Attached Storage) box?
 Question:
I have an Iomega Home Media Network Hard Drive, 1TB, and lately I can’t access the data on the drive. The shares (both built-in and created by me) are there, the security works, but when trying to access the data I get a “The network path was not found” message which is worrying, to say the least.
I’d like to know if there is a way to get the data off the disks somehow, as some of the data in the drive
Answer:
I’d download ubuntu, burn a CD-rom and boot it up and plug the drive into a USB to IDE converter and set the drive on your desk and once linux is booted, plug the drive in and see if it mounts.
Many of these devices are running linux, so you may need to boot off of a linux boot disk to mount the media.
DO not attempt to fix the data if it does not mount. Don’t use fsck, or chkdsk.
If it does, grab your data, if not email me using the link below.
SSD – Solid State Disks and Data Recovery.
 I’ve played with these devices and found the same results as described in this article on data recovery of SSD devices.
Basically, Solid state disks are flash type media and with trim enabled zero out the sectors as they are put into reuse.
The zeroing of the data blocks removes the data, no latent fingerprints.
Leaving no traces of your data after a delete makes me feel secure, however you really should be certain your backups are good as you can’t undelete files, they are gone for good.
In short, this makes forensic recovery impossible on the drive. Good for the bad guys, bad for the good guys.
Let me know what you think.
How to clone a drive with bad sectors (Sector by sector copy)
First, let me say this, leave it to the professionals if your data is critical. I do NOT recommend this if you can not afford to lose everything. All information contained in this article is to be used at YOUR OWN RISK. I will not be held responsible for your actions under any circumstances. Proceed with caution only if you are a geek.
Let me start by saying, I wrote this piece because I had to do a complex data recovery on a system damaged by a unix administrator trying to fix a drive that would not mount. This drive was, to make matters more complex, a striped raid array running an EXT2 partition type and all the files written were in inode tables. Those tables got shot by the attempt to repair the problem with FSCK. (NOTE DO NOT RUN FSCK to repair a drive that will not mount, unless you have a backup).
So, I have many tools to use if the drive is NTFS to restitch the 1 TB drives (2 of them) into one 2TB image file to run a recovery on. I do not have such tools in unix. This is the method I researched and successfully used to image the entire drive that was bad (was flaky, not dead) to a new 1 TB Western Digital drive.
I was then able to stitch the drives together in a virtual striped pair in Debian linux. I then used scalpel to retrieve the files that I could not retrieve with my unix recovery methods. (FSCK had shot the Inode table to hell).
So below is the method, tried and true, to image bit for bit an entire drive to another drive of everything, (even if there is no partition table available whatsoever (as is the case with a striped pair)). I prefer Debian however, I suggest UBUNTU in this article as it is easier to do the job from a bootable cdrom for an average windows technician to use.
If you can’t afford to have someone recover it, or think you are a super geek, here’s how to do a sector by sector copy of a drive that is failing to one that is new.
Mark the hard disk you have, set it aside as your source drive.
Grab a scratch drive (If you have one) and install ubuntu on it from the cd downloaded here:
http://www.ubuntu.com/getubuntu/download , burn it to a cdrom.
Boot the cdrom and install ubuntu, I say this because if you have a small hard disk, you can stop the copy process in the middle without losing data.
Once ubuntu is loaded, select the package manager, search for ddrescue and install it.
Now you will need the 2 USB to IDE adapters I mentioned just now. (Easier than any other method)
Plug the source Hard disk into the IDE – USB adapter and plug the power in. Don’t plug in the usb yet.
sudo fdisk -l will list all drives in the system and whatever partitions are available to you.
note and mark the drives.
Then plug in your usb and run it again
sudo fdisk -l
you will see and mark the appropriate /dev/sdb etc. Please physically mark the drive with a post it note.
Plug in your usb attached destination drive and run it once again.
sudo fdisk -l
and mark the drive with the info.
Another way is below
run this:
ls /dev/sda
ls /dev/sdb
ls /dev/sdc
as soon as you get a not found error, stop searching.
If you have a /dev/sda file not found, you can now plug in your usb.
Please note, I want you to tag the drive with a pen as /dev/xxx as soon as you discover what it is.
If /dev/sda was found, or no error, put a sticker with /dev/sda on the computer tower (that’s where the scratch drive is and apparently it’s either scsi, or SATA.
if /dev/sdb was not found, Plug in the usb and wait 30 seconds.
then issue the
ls /dev/sdb if there is not an error, you may tag the source drive /dev/sdb.
Then please plug in the drive you are copying to *Your Destination drive*
Issue the following if /dev/sdb was the last drive you tagged
ls /dev/sdc if no error, you may tag your destination drive as /dev/sdc
NOW for the magic.
You have a source drive (Tagged /dev/sdb for this example)
You have a destination drive (tagged /dev/sdc for this example.)
Issue the following command:
sudo ddrescue -n /dev/sdb /dev/sdc /home/root/logfile.log
This will take a while, but skips all troubled sectors.
sudo ddrescue -r3 /dev/sdb /dev/sdc /home/root/logfile.log
This command retrys all bad sectors logged above and makes this process much faster.
Once this is done, you can shutdown -h now and shutdown the computer.
On a seperate computer, running xp and having enough room for your critical files.
Plug in the USB to IDE adapter with the destination drive attached and powered on.
Copy any files if the partition will mount. If it will not mount, Install Get Data Back from runtime.org
Purchase a license for it and run it on the drive you recovered your data to to get as much as humanly possible back.
Below is a link I found after I wrote this all out for you.
http://www.linux.com/learn/tutorials/8225-clone-your-ubuntu-installation-onto-a-new-hard-disk
It has more information in other words, that you might find helpful for accomplishing a sector by sector (or byte by byte copy)
Video about Identity Theft and your old hard disk / computer
http://www.2thedeuce.com/video/?autoStart=true&topVideoCatNo=default&clipId=3686051
Personally, If I wanted to make my data unrecoverable by most means, I’d drill a hole (3/8″) down thru the platters (The rounded part of the drive).
This will destroy it so somebody would have to spend tens of thousands of dollars recovering your old data.
Installing a Raid on a SC420 right now.
Dell Poweredge SC420
I thought I might write some generic instructions that might be helpful if anyone attempts this on their own.
Here are the steps:
- With the computer off, mount all hardware ( in this case 2 500 Gigabyte Seagate Sata Drives)
- Boot the computer and press F2 to enter the Bios.
- under drive controllers, set the RAID to ON.
- Esc key and save & exit
- Press Ctrl-A on boot to enter the Adaptec Raid Controller Software.
- Select the two appropriate drives and then,
- Create a RAID array (RAID = Redundant Array of Independent Disks.)
- Select Mirrored (Writes to both hard disks at the same time for redundancy)
- Select yes, Ok and your raid array will build.
- Reboot and insert the Dell System manager disks and install your server software.
Hope this helps any techies listening getting the raid configured and setup correctly.
My criteria for selecting a data recovery specialist
- How much experience do their technicians have? (I have 20 years)
- What is their success rate? (mine is about 75%) anyone who claims over 80% is simply lying about theirs.
- Do they have a clean room? a clean bench? can they change heads? Transfer platters? (all these services are expensive but we can do them.)
- Do they offer references and do you know/trust them? I rely on referrals to bring me business.
- Do they offer to help you setup better backup systems? An ounce of prevention is …
- You only get one attempt at this recovery – so make the best of it and give us a call.